
A plug check is used to get an approximate read on the mixture settings in the three primary carburetor circuits. This is a secondary step to help solve any tuning problems that you may be experiencing, or as means to verify that your tuning is on. If you bike is running great with no problem through the three primary ranges, then this is just for sanity check.
|
Range
|
Circuit
|
Adjustment
|
|
Idle
|
Pilot
|
PMS Screws
|
|
Mid
|
Needle
|
Needle Shims
|
|
WOT (wide open throttle)
|
Main
|
Main Jet size
|
The plug read is pretty simple. You should have the tools handy to pull the plugs & some gloves to keep from being burned. Your ideal plug (used) has some color on the electrode and possibly the ceramic. A new plug will only begin to show color at the base of the ceramic down in the plug. The new ceramic takes time to show color changes. If you are too rich your plugs will be sooty black. If you are too lean your plugs will be white or grey with super clean electrodes. If you are critically lean you will have aluminum spots on the ceramic (very bad).
The idle check is the first. Let it idle for 5+ minutes and kill it and check the plugs. I prefer to run the PMS screws out until I get sooty plugs, Then I turn them in in 1/4 turns and run 10 minute checks. It will take some time, but once it stabilizes you will know it. In rare cases where the PMS screws are not providing the required adjustments, there have been times where the float levels needed to be adjusted.
The Mid throttle plug check is next. This is done with the throttle chop method. You run the bike at a steady 45-65 mph for 3-5 minutes, chop the throttle, pull in the clutch and kill the engine all at the same time. You coast to a safe place and pull the plugs. The idea is to capture the plug condition at that moment in time. Add shims to make it richer, remove shims to make it leaner. The adjustment of the needle shims does not require the removal of the cabs.
The WOT test is usually just to confirm the main jet choice. This test requires you to run full out and do a throttle chop. A larger jet will make it richer, a smaller jet will make it leaner.
<<<< Required Disclaimer >>>> We, in no way, endorse the use of speeds which exceed the limits permitted by local laws. All carburetion tests which may require higher speeds in excess of those permitted by local laws should be done on a dynamometer or on a closed course.
Plugs will retain a bit of color at idle because the combustion temperatures are lower. At cruise and full throttle, the plugs will burn clean and will be "white" except deep inside the tunnel if the mixture is correct (especially with new plugs). For best plug reads, check the color deep in the tunnel. The examples shown below are typical for the conditions listed.
 |
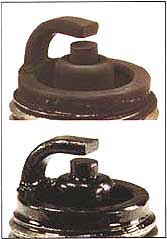
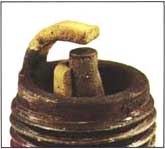
Normal Condition An engine's condition can be judged by the appearance of the spark plug's firing end. If the firing end of a spark plug is brown or light gray, the condition can be judged to be good and the spark plug is functioning optimally. |
 |
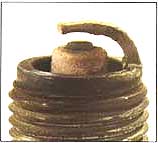
Dry and Wet Fouling Although there are many different cases, if the insulation resistance between the center electrode and the shell is over 10 ohms, the engine can be started normally. If the insulation resistance drops to 0 ohms, the firing end is fouled by either wet or dry carbon. |
 |
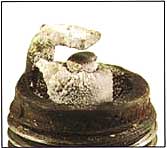
Overheating When a spark plug overheats, deposits that have accumulated on the insulator tip melt and give the insulator tip a glazed or glossy appearance. |
 |
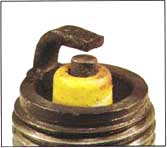
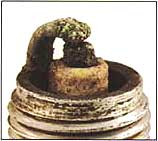
Deposits The accumulation of deposits on the firing end is influenced by oil leakage, fuel quality and the engine's operating duration. |
 |
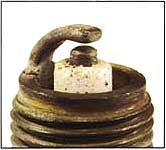
Lead Fouling Lead fouling usually appears as yellowish brown deposits on the insulator nose. This can not be detected by a resitsance tester at room temperature. Lead compounds combine at different temperatures. Those formed at 370-470°C (700-790°F) having the greatest influence on lead resistance. |
 |
Breakage Breakage is usually caused by thermal expansion and thermal shock due to sudden heating or cooling. |
 |
Normal Life A worn spark plug not only wastes fuel but also strains the whole ignition system because the expanded gap (due to erosion) requires higher voltages. Normal rates of gap growth are as follows: Four Stroke Engines: 0.01~0.02 mm/1,000 km (0.00063~0.000126 inches/1,000 miles) Two Stroke Engines: 0.02~0.04 mm/1,000 km (0.000126~0.00252 inches/1,000 miles) |
 |
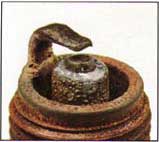
Abnormal Erosion Abnormal electrode erosion is caused by the effects of corrosion, oxidation and reaction with lead - all resulting in abnormal gap growth. |
 |
Melting Melting is caused by overheating. Mostly, the electrode surface is rather lustrous and uneven. The melting point of nickel alloy is 1,200~1,300°C (2,200~2,400°F). |
 |
Erosion, Corrosion and Oxidation The material of the electrodes has oxidized, and when the oxidation is heavy it will be green on the surface. The surface of the electrodes are also fretted and rough. |
 |
Lead Erosion Lead erosion is caused by lead compounds in the gasoline which react chemically with the material of the electrodes (nickel alloy) as high temperatures; crystal of nickel alloy fall off because of the lead compounds permeating and seperating the grain boundary of the nickel alloy. Typical lead erosion causes the surface of the ground electrode to become thinner, and the tip of the electrode looks as if it has been chipped. |